Best Vray Settings For Exterior Render Sketchup

Ever felt like your beautiful Sketchup model of that dream backyard looks... well, a bit flat? Like a cardboard cutout basking under a studio light instead of a real, sun-drenched oasis? Welcome to the club! Let's fix that with some simple Vray settings.
Lighting Up the Scene: Sun's Out, Fun's Out!
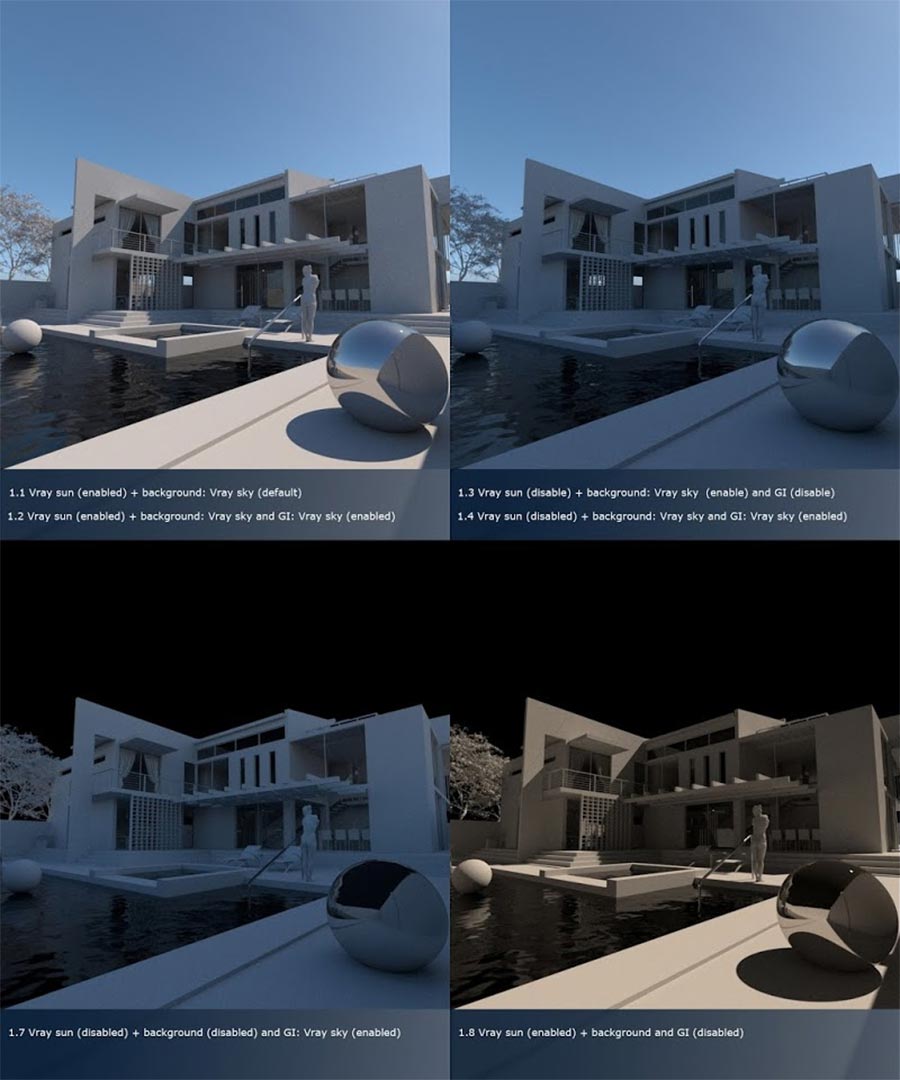
First, forget everything you think you know about fancy light rigs. We're going for simplicity. Vray's built-in sun is your best friend. Just crank it up, point it in a vaguely sunny direction, and bam! Instant light.
Don't be afraid to experiment. Think of it like adjusting the spice level in your grandma's famous chili – a little more here, a little less there. Keep rendering until it feels just right.
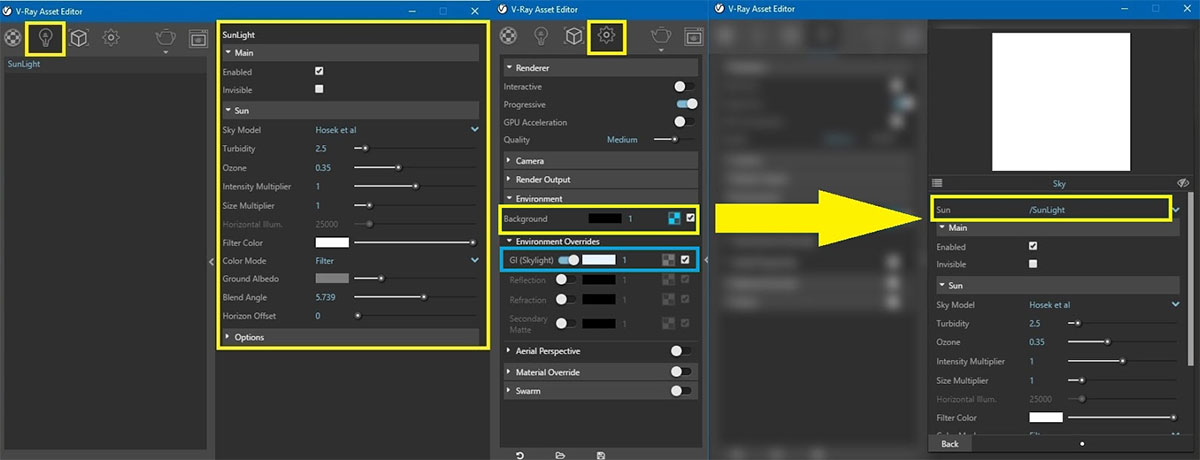
The Power of 'Environment'
Next up: the environment. This is where the magic happens. Find the little 'M' button (it stands for Material Editor, but 'Magic' is way more fun to remember). Click it.
In the Environment settings, play with the 'GI (Skylight)'. It is generally bluish. Add a touch of warmth to it. Maybe even a hint of pink if you're feeling adventurous.
Materials: Making Stuff Look Real
Okay, remember that perfect brick texture you downloaded? Let's make it pop. Start by adding reflection. Not too much, though. Unless you’re going for a super-polished, futuristic vibe (which, hey, no judgement!).
A little bump can go a long way too. Add it. It makes the surfaces feel rough and interesting. It's like giving your render a tiny, virtual massage.
Grass: The Green, Green Goodness
Ah, grass. The bane of many a 3D artist’s existence. But fear not! Instead of trying to model every single blade (please don't!), use a simple grass texture with a VrayFur modifier.
Tweak the length and thickness to your liking. It is recommended to use a lighter and more vibrant green for the tip. This way it looks more realistic. It is like giving your model a nice, grassy haircut.
Rendering: The Moment of Truth
Alright, deep breaths. It's time to render. Find the Render button (it usually looks like a little teapot). Press it.
Don't panic if it looks terrible at first. That’s perfectly normal. Start with a low resolution to test the lighting and materials. Tweak it when it's necessary.
Embrace the Noise
Noise, those grainy little speckles, is often the enemy. But a little noise can actually add realism! It gives your render a sense of imperfection, a hand-crafted feel.
If it is too much, just increase the 'Samples' settings. It will tell Vray to work harder on cleaning up the image.
Post-Processing: The Final Flourish
Congratulations! You have a render! But the fun doesn't stop there. Hop into a photo editing program like Photoshop or even a free online editor. Add a little contrast, adjust the colors, and maybe even throw in a subtle vignette.
Don’t be afraid to experiment! It’s like adding the final touches to a cake – a sprinkle of frosting here, a swirl of cream there.
The beauty of rendering isn't about achieving perfection; it's about the journey of bringing your vision to life. So, go forth, experiment, and have fun! You might just surprise yourself with what you create.