How To Draw A Weed Leaf Step By Step
Alright, art enthusiasts and curious minds! Ever wanted to doodle a weed leaf but felt like you needed a secret artist handshake to even start? Fear no more!
We're about to break down the process into something so simple, your grandma could probably do it (though, maybe don't show her this article just yet!). Get ready to unleash your inner artist!
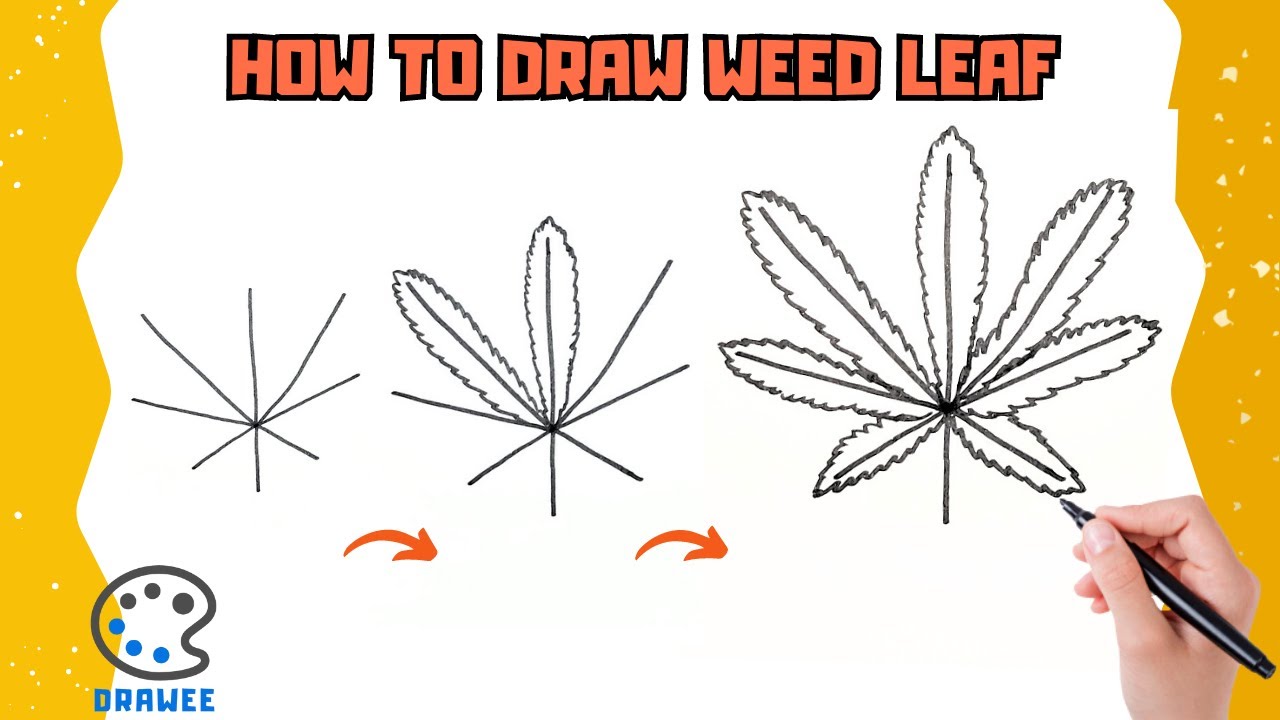
Step 1: The Circle of Life (or at Least, the Start of a Leaf)
Grab a piece of paper and a pencil – any paper will do, even that napkin you "borrowed" from the coffee shop. Now, draw a circle. Not a perfect one, nobody's judging your geometry skills here!
Think of it as the base for your masterpiece. This circle is like the blank canvas before Bob Ross starts painting happy little trees, or, you know, leaves.
Step 2: The Middle Ground (literally!)
Draw a vertical line straight down the center of your circle. It's like drawing the spine of your leaf. This line is crucial; it's the backbone of our beautiful botanical drawing.
Don't worry if it's not perfectly straight! Remember, nature isn't perfect, and neither is art. Embrace the imperfections!
Step 3: Branching Out (the Fun Part!)
Now, draw lines branching out from the center line on both sides. Start with the ones closest to the top of the circle.
These lines will determine the number of leaflets your leaf has. Let’s aim for a classic 7-leaflet leaf. Like seven little fingers ready to wave hello!
Step 4: Leaf It to Me (Shaping the Leaflets)
Time to give each of those lines some shape! Sketch out a pointy, oval-ish shape around each line. Don’t be afraid to make them a little jagged; real leaves aren’t perfectly smooth.
Imagine you're drawing slightly elongated teardrops. Each leaflet is like a mini-leaf in itself, all contributing to the overall awesomeness.
Step 5: Connect the Dots (Almost There!)
Connect the base of each leaflet back to the central line. This creates the signature jagged edges that make a weed leaf so recognizable. We're shaping the overall weed leaf drawing, giving it dimension!
Think of it as connecting the dots, but instead of making a picture of a clown, you're making something way cooler! You are connecting each leaf to the spine.
Step 6: Erase the Evidence (Cleaning Up)
Carefully erase the circle we drew in Step 1, and any extra lines that don't belong. This will clean up your drawing and make it look more polished.
It’s like cleaning up your kitchen after baking a cake. You get rid of the mess and leave only the delicious result! Your weed leaf drawing is taking shape!
Step 7: Adding Details (The Icing on the Cake)
Now, you can add some extra details! Draw veins inside each leaflet to give it more realism.
You can also add some shading to give it depth. Let your creativity flow like a river of artistic genius. Give the drawing some shading to make it pop!
Bonus Tip: Go Wild!
Don't be afraid to experiment! Try different shapes and sizes for your leaflets. Maybe add some little bug bites to make it look even more realistic.
The more you practice, the better you'll get. Remember, even Picasso started somewhere!
Disclaimer: This article is for entertainment and artistic purposes only. We are not encouraging any illegal activities. Please be responsible and respectful of the laws in your region.
And there you have it! You've successfully drawn a weed leaf. Now go forth and spread your newfound artistic skills to the world (or at least, to your notebook). Congratulations!