How To Make A Map Image In Minecraft

The vast, procedurally generated landscapes of Minecraft beckon exploration, but navigating these blocky worlds can quickly become disorienting. For years, players have relied on a vital in-game tool to conquer this challenge: the map. Mastering the creation and utilization of maps isn't merely about convenience; it's about efficient resource management, collaborative building, and ultimately, survival.
This article offers a step-by-step guide on crafting and maximizing the functionality of maps within Minecraft. From the initial resource gathering to advanced cartographic techniques, players will learn how to transform a blank canvas into a powerful navigational aid. Understanding these processes empowers players to document their discoveries, share information with teammates, and coordinate ambitious projects.
Gathering the Necessary Resources
The creation of a Minecraft map begins with acquiring the essential components: paper and a compass. Paper is crafted from sugarcane, a common plant found near bodies of water in most biomes. Three pieces of sugarcane crafted into paper are used for one map.
The compass, crucial for centering and orienting your map, requires iron and redstone. Iron ore must be smelted into iron ingots, and redstone is found deep underground, typically in caves and ravines. Combine four iron ingots around a single piece of redstone dust to craft a compass.
Crafting a Basic Map
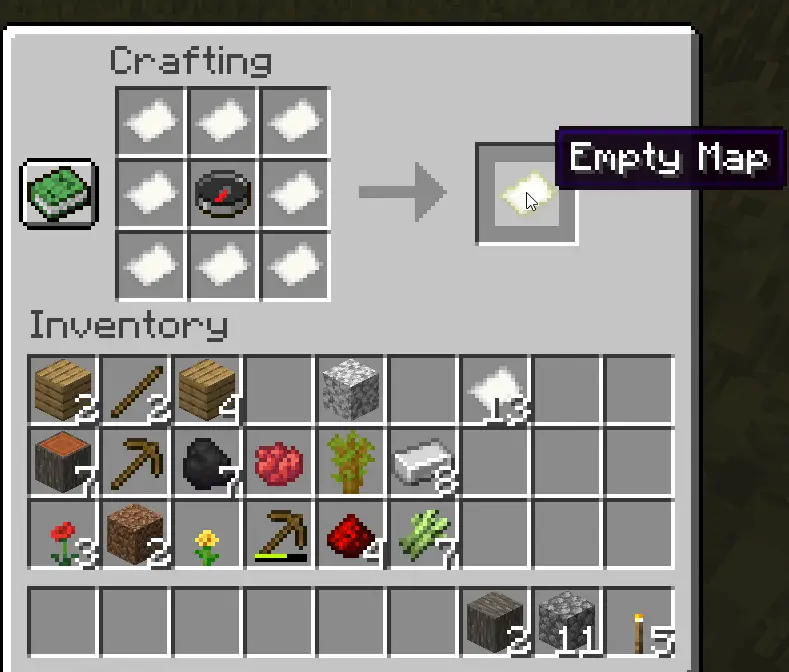
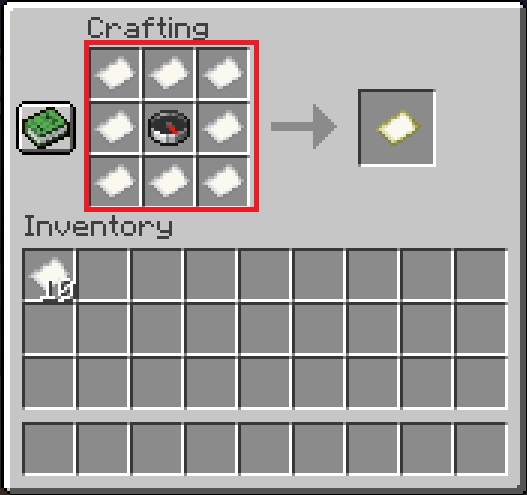
Once you have acquired nine pieces of paper, head to your crafting table. Place the paper in every slot of the crafting grid to create a blank map. Right-clicking the newly crafted blank map will activate it and begin charting the surrounding area.
The initial map will be a small-scale representation of your immediate surroundings. As you explore, the map will automatically fill in, revealing the terrain and structures within its boundaries. You can expand the area covered by your map by upgrading it.
Expanding and Locking Your Map
To increase the scale of your map, you need to use a crafting table with additional paper. Place your existing map in the center slot of the crafting grid, then surround it with eight pieces of paper. This process effectively zooms out the map, allowing it to cover a larger area at a reduced level of detail.
You can repeat this process up to four times, each time doubling the area covered by the map. Be mindful that as the scale increases, the map's resolution decreases, making finer details harder to discern. You can use Cartography Table for doing that.
Once your map is fully explored, you might want to prevent further changes, especially if you intend to use it for long-term navigation. To lock a map, you'll need a glass pane and the map you wish to lock.
Combine the map with a glass pane at an anvil to create a locked map. This will prevent any accidental changes from overwriting the data. Locked maps are particularly useful when sharing maps with others or using them in public spaces where accidental modification is a concern.
Utilizing Cartography Tables for Advanced Mapmaking
While crafting tables offer basic map creation, the cartography table provides more advanced functionality. This specialized workstation allows you to duplicate, zoom, lock, and rename maps with greater precision. Cartography table is crafted using planks and paper.
To duplicate a map, place the original map in one slot and a blank map in the other. This creates an identical copy, which is useful for sharing maps with other players. Duplication is a crucial tool for collaborative building and exploration.
The cartography table also makes the process of zooming in or out of maps more intuitive. By using paper or shears in conjunction with a map, you can precisely control the scale and zoom level. This provides more flexibility compared to the standard crafting table method.
Adding Markers and Sharing Maps
Beyond basic exploration, maps can be enhanced with markers to denote specific locations. Banners, when placed in the world, can be linked to maps to indicate points of interest. The color of the banner will be displayed on the map, creating a visual cue.
These markers are invaluable for marking your home base, resource locations, or points of danger. By strategically placing and linking banners, you can transform your map into a dynamic and informative tool.
Sharing maps with other players is essential for multiplayer cooperation. Simply give or trade a copy of your map to a teammate. Players on the same server will see the same map data, allowing for coordinated movements and shared exploration.
The Future of Cartography in Minecraft
As Minecraft continues to evolve, the cartography system is also likely to see further development. Improved tools, such as the cartography table, demonstrate a commitment to enhancing the mapmaking experience.
The potential for integrating more dynamic data into maps, such as player locations or real-time resource availability, could greatly improve navigation and collaboration. As the game's world becomes increasingly complex, the importance of effective mapping will only grow.


:max_bytes(150000):strip_icc()/011_how-to-make-a-map-in-minecraft-5218244-db20ce6fbeaa4b1c93b444d94e12d221.jpg)


