How To Install Bootloader On Ender 3
So, you've got an Ender 3, huh? Welcome to the club of sleepless nights and oddly satisfying plastic creations. But have you ever thought about giving your printer a little brain boost?
Let's talk about installing a bootloader. It's like giving your Ender 3 a secret handshake to access its inner wisdom.
Gather Your Supplies (and Your Sanity)
First things first, you'll need a few things. Don't worry, it's not like disarming a bomb, but a steady hand and a bit of patience helps.
You'll need an Arduino, some jumper wires (colorful spaghetti, basically), and your trusty Ender 3. And maybe a cup of coffee. Possibly several.
Connecting the Dots (Literally)
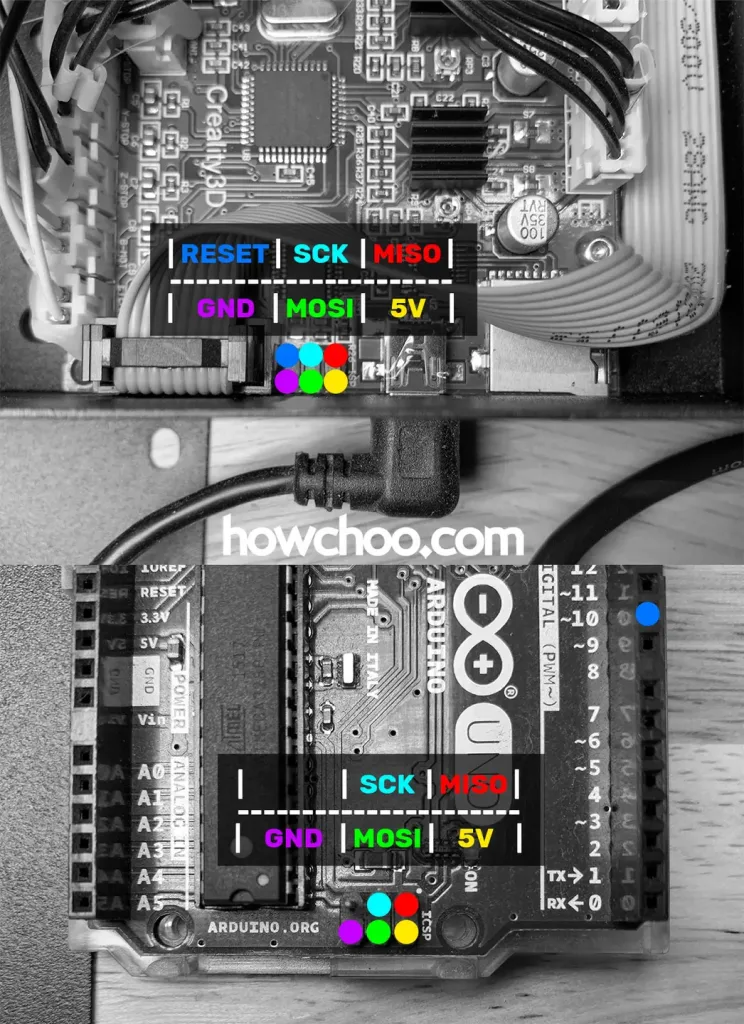
Now comes the fun part: connecting the Arduino to your Ender 3's mainboard. It's like playing a game of electronic Twister.
We're talking about plugging those jumper wires into the right spots. There are tutorials online that look like alien blueprints, but don't panic! Think of it as a connect-the-dots puzzle where the reward is a smarter printer.
It might feel like you're performing open-heart surgery on your printer, but trust the process. Just follow the instructions carefully and double-check everything.
The Arduino Tango
Next, you'll need to upload some code to the Arduino. It's kind of like teaching it a new language, but instead of "hola," it's "bootloader time!"
The Arduino IDE (Integrated Development Environment) is your friend here. It's where you'll upload the code that tells the Arduino what to do.
This is where things might get a little...nerdy. But don't let the code intimidate you; copy, paste, and click upload. You got this!
Burning the Bootloader (Not in a Bad Way)
Now for the grand finale: burning the bootloader. This is where you actually transfer the code from the Arduino to your Ender 3's brain.
It sounds dramatic, like you're setting something on fire, but it's just data transfer. The magic happens in the silicon chips, I promise!
Keep your fingers crossed, say a little prayer to the 3D printing gods, and hit that "burn bootloader" button. It might take a few minutes, so go refill that coffee.
Success! (Hopefully)
If all goes well, you'll get a message saying "Done burning bootloader." Cue the confetti and celebratory dance!
If not, don't despair. Check your connections, double-check your code, and try again. Troubleshooting is part of the 3D printing adventure.
You've just given your Ender 3 a brain upgrade. Now it's ready for even more exciting adventures in the world of 3D printing. Go forth and create!
Now unplug those jumper wires, put your Arduino back in its box, and bask in the glory of your newfound tech wizardry. You just installed a bootloader! Who knew you were so cool?
And remember, 3D printing is about learning, experimenting, and occasionally yelling at a machine. But hey, at least now your machine is slightly smarter.